What it is for#
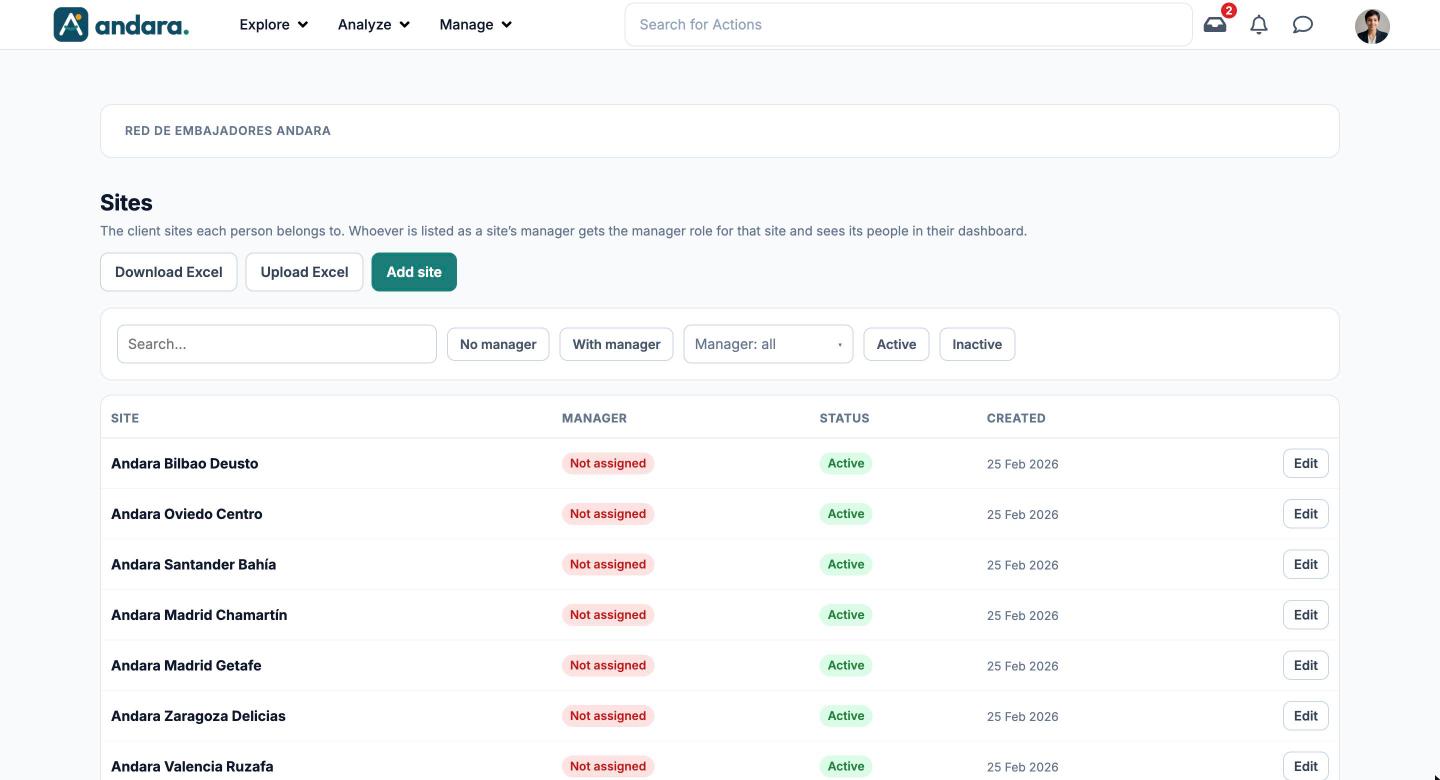
These are your company's workplaces (shops, offices, branches) that each person in the project belongs to. Whoever is listed as a site's manager gets the manager role for that site and sees its people in their dashboard.
Sites are what you pick in the Location field of each person's profile, in Users, and they are used to target content and reports by site. In the app the screen is called Sites.
Where it is: Manage › Users › Locations.
What you see#
| Element | What it shows |
|---|---|
| Download Excel | Downloads the list of sites as an Excel file, to edit them in bulk. |
| Upload Excel | Opens the upload of an Excel file with changes (see Upload Excel below). |
| Add site | Opens a blank form to create a site. |
| Search… | Filters the list as you type. |
| No manager / With manager | Shows only the sites without a manager, or only those with one. |
| Manager: all | Drop-down to see only one manager's sites. |
| Active / Inactive | Shows only active or only inactive sites. |
| Site | The site's name. |
| Manager | The person with the manager role for that site. Not assigned in red if there is nobody. |
| Status | Active or Inactive. |
| Created | The date it was created. |
| Edit | Opens the site's form. |
Settings#
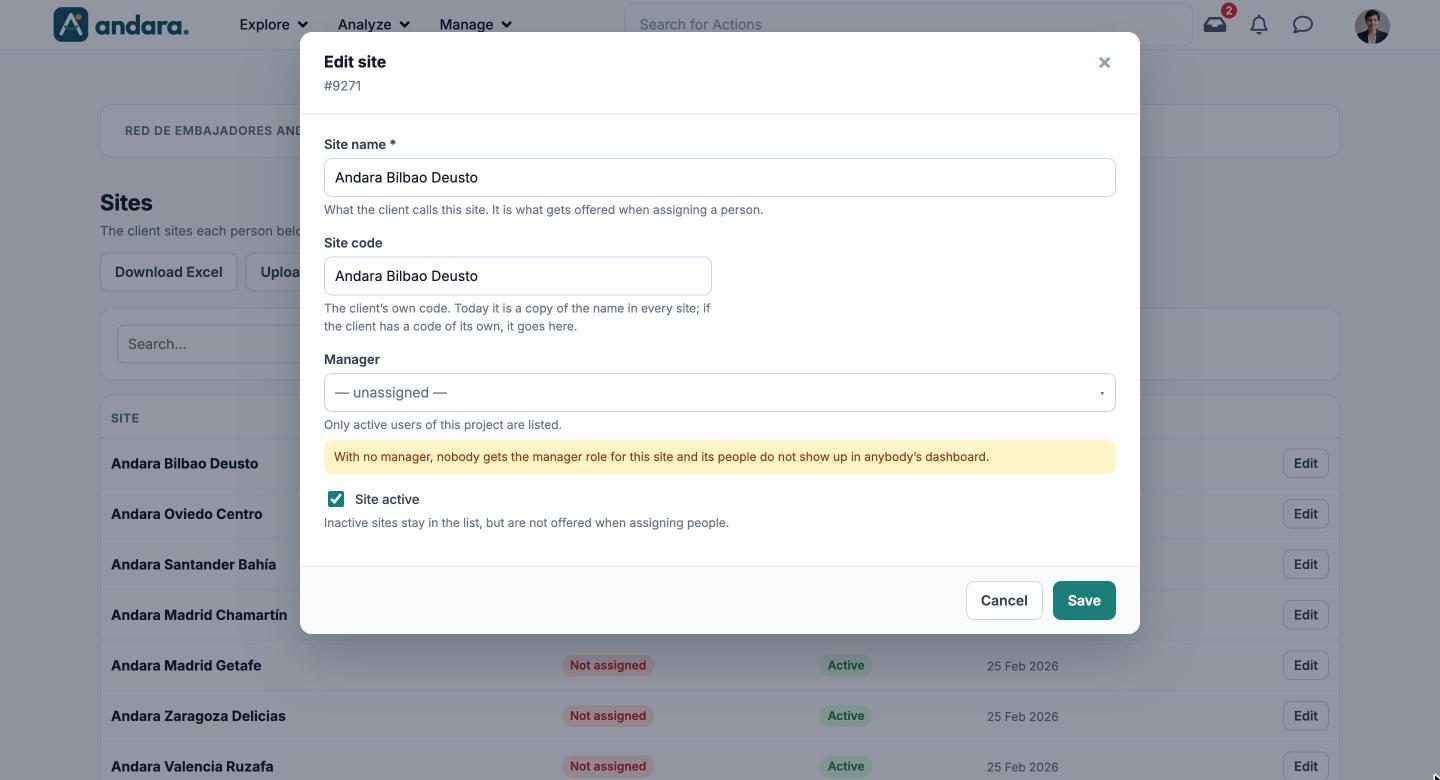
A site's form is the same to create it and to edit it (Edit site).
| Field | What it does | Values |
|---|---|---|
| Site name | What your company calls this site. It is what gets offered when assigning a person. | Text. Required. |
| Site code | Your company's code for the site. If you have no code of your own, it can be a copy of the name. | Free text. |
| Manager | Whoever is listed here gets the manager role for this site and sees its people in their dashboard. With no manager, nobody has that role and its people do not show up in anybody's dashboard; the form warns you in yellow. | One of the project's active users, or — unassigned —. Default: — unassigned —. |
| Site active | Inactive sites stay in the list, but are not offered when assigning people. | Tick box. Ticked by default. |
Upload Excel#
It works just like in Organisations: you download the Excel file, edit it and upload it in the upload window.
| Field | What it does | Values |
|---|---|---|
| File | The Excel file with the sites. Rows with an ID are edited, rows without an ID are created, and sites missing from the file are left alone. To deactivate one, set Active = No. Before saving you see what will change in each row. | .xlsx, .xls or .csv file. |
How to#
Create a site#
- 1
Open a blank form
Click Add site.
- 2
Name it and give it a code
Type the Site name as your company uses it and its Site code.
- 3
Assign the manager
Pick the person under Manager. That person becomes the site's manager.
- 4
Save
Click Save. The site can now be picked in each person's profile.
Give a manager to the sites that have none#
- 1
Filter
Click No manager.
- 2
Assign them one by one
Click Edit on each site, pick the person under Manager and click Save.
Things to know#
- Assigning a manager here gives them the manager role for that site. Removing them takes it away. Admin roles, on the other hand, are given in Roles.
- A site with no manager leaves its people out of every dashboard. The list flags it with Not assigned in red.
- The manager drop-down only lists the project's active people.
- In the Excel file, a row that is not in the file is not deleted. To remove a site, make it inactive.
Related#
- Users: where each person is assigned to their site.
- Organisations: the other axis of the structure, by unit.
- The manager's panel: what each site's manager sees.
- Getting started: build the structure before adding anyone.